Contents
Multiple MLX90614 Sensors Take Two
Over two years ago I wrote this article about giving an MLX90614 a new slave address, different from the default they are all set with from the factory (0x5A), in order to enable having more than one individually addressable device on the bus.
As before I am still using two of these MLX90614 sensors in my cloud detection project and have changed slave addresses on these devices many times before with very few problems.
Why am I writing a new post about this? Well I have had quite a few questions on my original article and I decided to hopefully make a few things a little clearer with some updated code examples thrown into the mix.
What are we going to do in this article? Focus on the following:
- Take a quick peek at the MLX90614 again
- Look at some updated code for changing slave addresses
- See the range of supported addresses
- Look at actually running the code
The MLX90614
Let's take a quick look at the sensor itself; once again, note the reference image of a pinout diagram of the device from the Melexis MLX90614 Datasheet:
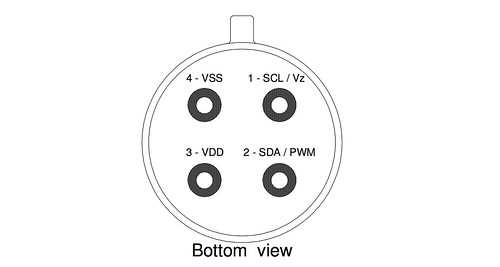
MLX90614 Pinout - courtesy of Melexis NV
Required Code for Changing Slave Address
Let's take a look at the improved code.
Code layout
I've gone for a slightly different layout with the Arduino code in the hope of making the main functionality simpler. The ReadTemp function has been moved into a separate file (read_temp.ino) alongside the main remap_mlx.ino file.
.
├──README.md
└──remap_mlx
    ├──README.md
    ├──remap_mlx.ino
    └──read_temp.ino
remap_mlx.ino
What have I done to "improve" the code? Not much really: I've mostly concentrated on making the serial console output a little clearer so that users should have more of an idea what is going on.
Let's break the first 30 lines down a little - those are the most interesting part; they run the show procedure-wise.
I start with including the i2cmaster library and setting a slave address, that is, the address we want the MLX90614 to finish up with.
The setup() function runs only once, as always happens in Arduino land; Serial communications are set up along with a message. i2c is initiated along with a bit of manipulation of the port registers and then a five second sleep. Next, I read the current slave address of the MLX90614 using the universal address (0) - this returns three pieces of data, the first of which is the slave address:
> [ReadAddr] Reading address
  Using MLX univeral address, Data: 2B, 0, FF
The above example is with a slave address of 2B.
Once the current address is read out, I start the process of setting a new slave address (NewMLXAddr).
Contents of remap_mlx.ino:
1 2 3 4 5 6 7 8 9 10 11 12 13 14 15 16 17 18 19 20 21 22 23 24 25 26 27 28 29 30 31 32 33 34 35 36 37 38 39 40 41 42 43 44 45 46 47 48 49 50 51 52 53 54 55 56 57 58 59 60 61 62 63 64 65 66 67 68 69 70 71 72 73 74 75 76 77 78 79 80 81 82 83 84 85 86 87 88 89 90 91 92 93 94 95 96 97 98 99 100 101 102 103 104 105 106 107 108 109 110 111 112 113 | // remap_mlx90614.ino
#include "i2cmaster.h"
// New slave address (default is 0x5A)
byte NewMLXAddr = 0x2B;
void setup(){
Serial.begin(9600);
Serial.println("Setup...");
// Initialise some stuff
i2c_init();
PORTC = (1 << PORTC4) | (1 << PORTC5);
delay(5000);
// Read on universal address (0)
ReadAddr(0);
// Change to new address NewMLXAddr
ChangeAddr(NewMLXAddr, 0x00);
// Read on universal address (0)
ReadAddr(0);
Serial.println("**---READY---**");
// Signal user to cycle power
Serial.println("> [setup] Cycle power NOW to store new address - you have 10 seconds");
delay(10000);
// Read on universal address (0)
ReadAddr(0);
Serial.println(" Warning, next ReadTemp() may fail if address has not been set.");
ReadTemp(NewMLXAddr);
Serial.println("**---DONE---**");
}
/**
* Read temperature from MLX at new address once setup() is done.
*
*/
void loop(){
delay(5000);
ReadTemp(NewMLXAddr);
}
/**
* Changes the address of the MLX to NewAddr1.
*
*/
word ChangeAddr(byte NewAddr1, byte NewAddr2) {
Serial.print("> [ChangeAddr] Will change address to: ");
Serial.println(NewAddr1, HEX);
i2c_start_wait(0 + I2C_WRITE);
i2c_write(0x2E);
i2c_write(0x00);
i2c_write(0x00);
if (i2c_write(0x6F) == 0) {
i2c_stop();
Serial.println("> [ChangeAddr] Data erased.");
}
else {
i2c_stop();
Serial.println("> [ChangeAddr] Failed to erase data");
return -1;
}
Serial.print("> [ChangeAddr] Writing data: ");
Serial.print(NewAddr1, HEX);
Serial.print(", ");
Serial.println(NewAddr2, HEX);
for (int a = 0; a != 256; a++) {
i2c_start_wait(0 + I2C_WRITE);
i2c_write(0x2E);
i2c_write(NewAddr1);
i2c_write(NewAddr2);
if (i2c_write(a) == 0) {
i2c_stop();
delay(100);
Serial.print("> [ChangeAddr] Found correct CRC: 0x");
Serial.println(a, HEX);
return a;
}
}
i2c_stop();
Serial.println("> [ChangeAddr] Correct CRC not found");
return -1;
}
/**
* Reads the MLX address.
*
*/
byte ReadAddr(byte MLXAddress) {
byte NewMLXAddress;
Serial.println("> [ReadAddr] Reading address");
if (MLXAddress == 0) {
Serial.print(" Using MLX univeral address");
} else {
Serial.print(" Using MLX address: ");
Serial.print(MLXAddress, HEX);
}
Serial.print(", Data: ");
i2c_start_wait(MLXAddress + I2C_WRITE);
i2c_write(0x2E);
i2c_rep_start(MLXAddress + I2C_READ);
NewMLXAddress = i2c_readAck();
Serial.print(NewMLXAddress, HEX);
Serial.print(", ");
Serial.print(i2c_readAck(), HEX);
Serial.print(", ");
Serial.println(i2c_readNak(), HEX);
i2c_stop();
return NewMLXAddress;
}
|
I've moved the often called ReadTemp() function into a separate file in order to try and simplify the content of remap_mlx - see below:
read_temp.ino
Contents of read_temp.ino:
1 2 3 4 5 6 7 8 9 10 11 12 13 14 15 16 17 18 19 20 21 22 23 24 25 26 27 28 29 30 31 32 33 34 35 36 | // read_temp.ino
/**
* Utility function to read temperature from MLX at address
*
*/
float ReadTemp(byte address) {
int data_low = 0;
int data_high = 0;
int pec = 0;
byte MLXAddress = address<<1;
Serial.print("> [ReadTemp] Read temperature ");
if (MLXAddress == 0) {
Serial.print("using MLX univeral address");
} else {
Serial.print("using MLX address ");
Serial.print(address, HEX);
};
Serial.print(": ");
i2c_start_wait(MLXAddress + I2C_WRITE);
i2c_write(0x07);
i2c_rep_start(MLXAddress + I2C_READ);
data_low = i2c_readAck();
data_high = i2c_readAck();
pec = i2c_readNak();
i2c_stop();
float temp = 0x0000;
temp = (float)(((data_high & 0x007F) << 8) + data_low);
temp = (temp * 0.02) - 273.16;
Serial.print(temp);
Serial.println(" C");
return temp;
}
|
As long as remap_mlx.ino and read_temp.ino are side by side in a project directory as described above, your Arduino development environment won't have any issues compiling the code.
Address Range Supported by the MLX90614
Once again, the Melexis MLX90614 Datasheet states that "the SA feature allows connecting up to 127 devices (SA=0x00...0x07F) with only 2 wires". I have experimented with many different addresses between 0x00 and 0x07F. I cannot really emphasise that enough - I've yet to find an address in that range that would not be accepted as a slave address.
Purely for the avoidance of doubt, I've run a little Python one liner below to show the range of acceptable slave addresses. These will all work!
>>> [format(x, '#04x') for x in range(1,128)]
[
    '0x00', '0x01', '0x02', '0x03', '0x04', '0x05', '0x06', '0x07',
    '0x08', '0x09', '0x0a', '0x0b', '0x0c', '0x0d', '0x0e', '0x0f',
    '0x10', '0x11', '0x12', '0x13', '0x14', '0x15', '0x16', '0x17',
    '0x18', '0x19', '0x1a', '0x1b', '0x1c', '0x1d', '0x1e', '0x1f',
    '0x20', '0x21', '0x22', '0x23', '0x24', '0x25', '0x26', '0x27',
    '0x28', '0x29', '0x2a', '0x2b', '0x2c', '0x2d', '0x2e', '0x2f',
    '0x30', '0x31', '0x32', '0x33', '0x34', '0x35', '0x36', '0x37',
    '0x38', '0x39', '0x3a', '0x3b', '0x3c', '0x3d', '0x3e', '0x3f',
    '0x40', '0x41', '0x42', '0x43', '0x44', '0x45', '0x46', '0x47',
    '0x48', '0x49', '0x4a', '0x4b', '0x4c', '0x4d', '0x4e', '0x4f',
    '0x50', '0x51', '0x52', '0x53', '0x54', '0x55', '0x56', '0x57',
    '0x58', '0x59', '0x5a', '0x5b', '0x5c', '0x5d', '0x5e', '0x5f',
    '0x60', '0x61', '0x62', '0x63', '0x64', '0x65', '0x66', '0x67',
    '0x68', '0x69', '0x6a', '0x6b', '0x6c', '0x6d', '0x6e', '0x6f',
    '0x70', '0x71', '0x72', '0x73', '0x74', '0x75', '0x76', '0x77',
    '0x78', '0x79', '0x7a', '0x7b', '0x7c', '0x7d', '0x7e', '0x7f'
]
Running the Code
As in the previous post, the Arduino, MLX and a power cycle switch, below:
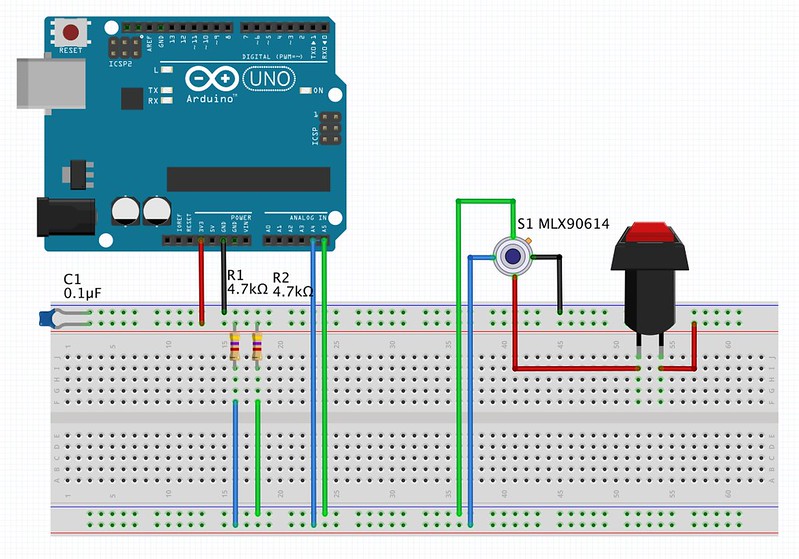
An Arduino and MLX90614 with NC switch on the supply
Again, these instructions remain the same as the previous post, but note the warning!
Warning
One note of caution - when attempting to change addresses do not have more than one MLX90614 on the circuit at the same time.
Upload this program above to your Arduino and run it, being ready to pounce with that wire or push switch during the 10 second pause.
Here's what my output looked like when changing the address of a device from 0x2A to 0x2B, using the new progam from this post:
Setup...
> [ReadAddr] Reading address
  Using MLX univeral address, Data: 2A, 0, FF
> [ChangeAddr] Will change address to: 2B
> [ChangeAddr] Data erased.
> [ChangeAddr] Writing data: 2B, 0
> [ChangeAddr] Found correct CRC: 0xE1
> [ReadAddr] Reading address
  Using MLX univeral address, Data: 2B, 0, FF
**---READY---**
> [setup] Cycle power NOW to store new address - you have 10 seconds
> [ReadAddr] Reading address
  Using MLX univeral address, Data: 2B, 0, FF
  Warning, next ReadTemp() may fail if address has not been set.
> [ReadTemp] Read temperature using MLX address: 2B, 18.64 C
**---DONE---**
> [ReadTemp] Read temperature using MLX address: 2B, 18.62 C
Finally
Hopefully you'll find some success in remapping MLX addresses - try it out and give me some feedback on how things go.
The code is available here at my Github repository.
Comments
comments powered by Disqus